What is CI/CD?
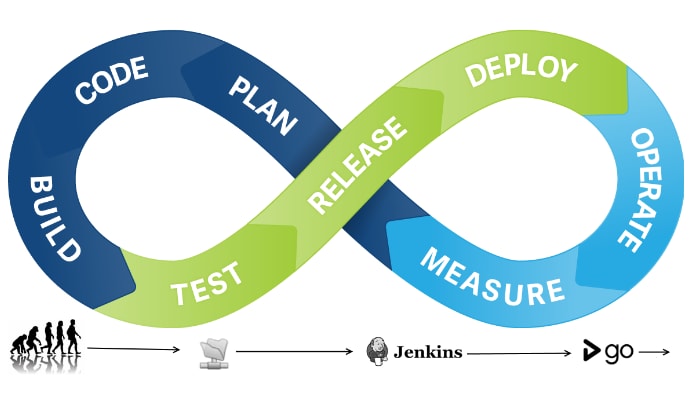
CI/CD stands for Continuous Integration and Continuous Deployment. Continuous Integration means building your application continuously. Consider, a scenario where developer makes some changes in source code. Now Continuous Integration must be able to fetch that source code and prepare a Build.Build also involves compiling and validating your code, code review, Unit Testing and Integration Testing, also packaging your application.
After Continuous Integration we have Continuous Delivery. Until now your product is ready, tested and ready for delivery. Consider, a Continuous Integration tools like Jenkins which deploy into the test servers to perform a user acceptance testing and once this is done it will be deployed onto the prod server for release. If this step is done manually then it is called Continuous Delivery but yes if its done automatically then its Continuous Deployment.
Understanding the WorkFlow
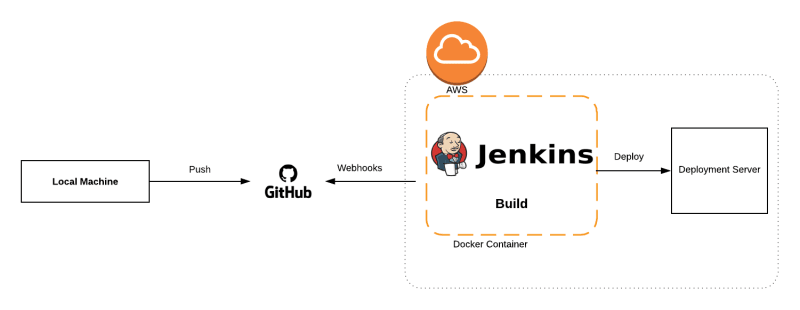
First, Let's have simple Hello world project in our local machine and initialize git. Once done push our code to remote repository. Next, We will write simple Jenkins Job so that It will trigger and deploy our code to dev server.We will create two different aws instance for jenkins and dev. Remember, we will run jenkins application inside Docker Container so that we donot have to go through manual installation.

Let's Bring It To Life.
Inside Local Machine
Step 1: Let's create simple Hello World Project written in php.
Step 2: Initialize git, commit and push your changes to remote repository.
Inside GitHub
Create a webhook so that jenkins jobs would trigger or look for changes whenever code is pushed to specified branch.
Go to Settings -> Webhooks -> Add Webhooks.
Payload URl: The URL is in the form $JENKINS_BASE_URL/github-webhook/ — for example: https://ci.example.com/jenkins/github-webhook/.
Content Type: application/json
Secret Key: Secret Key so that github can access jenkins.
Which events would you like to trigger this webhook? : Depends on events you prefer. I have just checked for pushed event i.e. job is triggered whenever something is pushed to github master branch. (For specific branch name you can mention it from jenkins).
Update Webhooks. That's it inside Github.
Inside Jenkins Instance
Step 1: ssh to your aws Jenkins instance
ssh -iStep 2: Run update your packages.
sudo apt-get updateStep 3: Install docker
sudo apt-get install docker.ioStep 4: Add Docker to your user group and login again after exit
sudo usermod -aG docker ubuntuStep 5: Let's pull docker image for jenkins:
docker pull jenkins/jenkins
docker images
Step 6: Run Docker
docker run -d -p 8080:8080 --name test_jenkStep 7: Type sh docker ps to see running container
Note: Before accessing, open the add inbound rules in aws. choose security groups(launch-wizard). click Edit->Add Rules, set custom tcp rules and _external port range (my case 8080)_also http rule then save
Voila! you can then run jenkins, Install suggested plugin (default). Fill the required credential and set your first job set!
Step 1: create Freestyle Project.
Step 2: Add some Description and give the github repository url from where jenkins would fetch your project.
Remember, to setup webhook inside github. Go to settings->webhooks->add payload url i.e /github-webhook/
Step 3: Write some shell script to deploy your code inside dev-server.
To establish, a connection between jenkins and dev instance we need to add jenkins public key to dev authorized key.
In jenkins instance run ssh-keygen to generate the .pub key and copy public key from .ssh/ to dev ./ssh/authorized_keys.
instance = '13.232.89.159'
ARCHIVE_FILENAME = cicd.zip
zip --symlinks -x *.git* -r $ARCHIVE_FILENAME . #compress all the files and create zip file
echo "--------Copying Files to remote dev server from jenkins ----------"
scp -o StrictHostKeyChecking=no index.tar.gz ubuntu@$instance:/home/ubuntu/
echo "--------Finished Copying----------"
echo "Entering to Dev Instance"
ssh -o StrictHostKeyChecking=no ubuntu@$instance '
  mv $ARCHIVE_FILENAME /var/www/html #move zip file from current directory to /var/www/html
  cd /var/www/html
  unzip $ARCHIVE_FILENAME
  rm -rf $ARCHIVE_FILENAME #remove the file once done
'
Once, the scripting part is done let's save and build our job. After successful job build we can access our deployment server from our browser and see the changes made.
This is just a simple example we have done, just to understand the workflow of CI/CD.